


It’s bound to happen. Your airplane hits the shop for an annual inspection and all seems to be going well until that dreaded call from the mechanic, who says the propeller (or propellers, if it’s a twin) needs to get shipped to a propeller shop for overhaul.
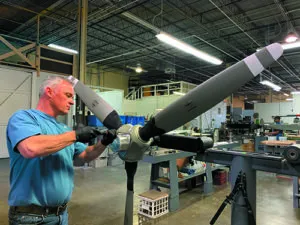
But what exactly happens to that propeller once it hits the shop is a mystery of sorts, as propeller maintenance is specialty work. To unravel the mystery, I spent some time at Sensenich Propeller Services in Georgia, one of the country’s oldest and highest-volume propeller shops. Here’s a field report.
Think Inside The TBO
Sensenich Propeller Services is an FAA Repair Station with over 40 years’ experience servicing props, and the company was spun off the original Litiz, Pennsylvania-based prop maker Sensenich Brothers Propeller to support the props in service.
Today, the company has two locations including the Lititz, Pennsylvania, shop and the one in Gainesville, Georgia. Sensenich works with everything from fixed-pitch to turbo propellers (when we visited it had a huge supply of King Air props) from McCauley, Hartzell, Sensenich and composite MT-Propeller models. It also works with Woodward/Ontic, Dowty and Hamilton Standard governors.
Dan Landin, the shop’s general manager, believes the propeller—which has manufacturer recommended TBO and maintenance intervals (typically five years and 1000 to 2000 flight hours)—is the most neglected accessory on the aircraft. As you’d expect, corrosion inside the hub is the enemy and as he noted, once a prop comes through his doors it’s often too late to salvage without doing a complete overhaul. In other cases, a repair and reseal can be accomplished.
“It’s internal corrosion from moisture and condensation getting inside the hub. Unfortunately if you wait until there are problems, it’s too late for a basic repair,” Landin said. The overhaul process (done right) is extensive and time consuming, as I found out during my visit.
In-The-Door Testing
A sizable expense that tags along with major prop work is actually getting it to the shop. The props are generally shipped in large wooden crates at a cost that can top $600. Sensenich offers a pickup and delivery service that covers the East Coast and into Texas at fees that range from $50 to $250.
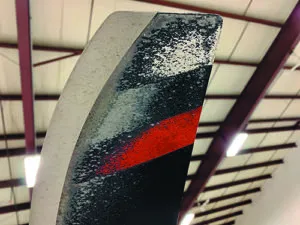
Once the prop is removed from the crate, the stringent paperwork chase begins and it undergoes a preliminary inspection, which includes verifying the propeller model, serial number and its condition, including any hidden damage. The props I saw varied in condition. Many were slinging oil, some had obvious signs of corrosion and many had blade damage. Ugly.
The next step is at the disassembly station where the techs remove any external components including de-icing boots. This process is also an opportunity to spot other imperfections that weren’t caught during the initial inspection. The next stop is the non-destructive testing (NDT) station. Here the propeller is inspected for cracks, damage, corrosion and any imperfections in the metal. All aluminum parts are inspected, and steel parts are submerged in dye penetrant liquid, rinsed, heated to dry and then inspected under a black light for further signs of cracks or stress.
Once deemed structurally sound, it’s time to measure the various components’ specs, including putting a close eye and a micrometer to the prop’s piston rod to check the outside diameter for tolerance and damage. All measurements are recorded on the propeller’s work order. Any component that’s found to be outside of tolerance or damaged is red-tagged and scrapped so it can never be returned to service.
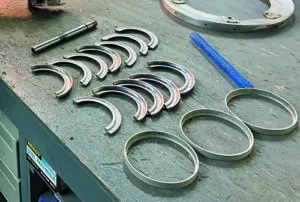
Many of the in-tolerance steel components are sent for a plating process. This is a sacrificial nickel-cadmium metal coating in hopes of preserving it from corrosion until the next TBO. It’s common to find corrosion and wear on a prop’s bearing races. The bearing arrangement circumferentially surrounds and engages with a section of the prop blade. The outer race assembly has roller bearings and the inner assembly has angular contact bearings. These have reconditioning limits and if they’re met, the tech makes it so.
While the hub components are at the NDT station, the propeller blades are over at the blade conformance station. This is where the blade is precisely measured to make sure it’s still within original manufacturer’s tolerances. The tech does a leading-edge and face (back area of the propeller) alignment check, while measuring the blade’s width and thickness with a micrometer. In general, we’re told a blade can go through two overhauls in its life and remain within tolerance. There’s a reason for that—evident by the next step in the overhaul.
Shave The Blade
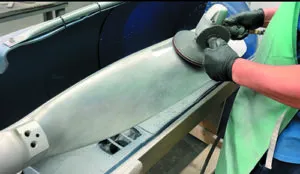
Once the conformity check is completed, the dye penetrant inspection is accomplished and the blade bore inspection is done, it’s time to recondition the propeller blades. It’s a crude but highly critical step in the overhaul that takes a specialized skill to shave the surface of the propeller blade. Done correctly, the blade will look like new. No more nicks, pits, scrapes and imperfections from those high-power taxi runs on loose surfaces.
Blade reconditioning is an art because you have to ensure the airfoil remains clean, while maintaining the original shape of the blade and the prop’s tip. This is done by hand with a rotary sanding machine.
If you want to alter the pitch of your fixed-pitched propeller, now is the time to do it. Maybe you want to get off the ground more quickly, or tweak some speed in cruise. There’s a mystery behind the process, and it comes down to twisting the blade to get the precise pitch for the performance you’re after.
Look to the aircraft’s type certificate to see if it lists multiple pitch settings. Propeller pitch is measured in inches of forward movement per one rotation of the blade. There’s both a climb and a cruise pitch setting.
Sensenich has a hydraulic blade-twisting machine that was fashioned after what the factory uses to twist a blade. It essentially has two hydraulic cylinders that oppose each other. Under pressure, one cylinder goes one way and the other the opposite, which causes the blade to bend. It’s a somewhat crude, tedious and precise process that starts with the tech marking a series of points (stations) on the blade, which are measured from the hub. Using a digital protractor the tech measures the angles at every station of the blade’s face, comparing them with the specs from the original build. You can only alter (or bend) the fixed-pitch blade a certain amount—a couple of inches in either direction, in general. Of course, blade damage from a prop strike is another story. The techs at Sensenich had some amusing but scary stories of so-called field repairs to prop blades that were involved in gear-up landings and object strikes. Everything from pilots hammering the blades back into shape (or at least they thought), to mechanics heating the blades until red hot and bending them. Don’t do it. If you have a prop strike—and that includes a run-in with wildlife—don’t even think about flying the airplane until a qualified tech inspects the blades.
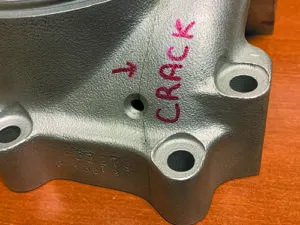
Interestingly, Landis showed me a cracked hub from a twin Cessna that smacked a deer on the runway. After the pilot cleaned the guts from the blade there were no signs of damage or bending. Landis strongly advised against flying the airplane, which was solid advice given the size of the crack his shop found on the hub.
Painting And Final Assembly
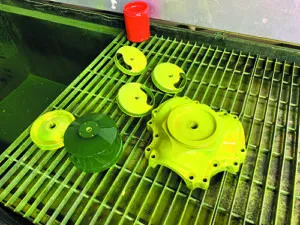
Before heading to the painting booth, the metal propeller blades are dipped in Alodine, also known as chromate chem film. Alodining helps the paint adhere to the blade, while also protecting the blade against corrosion. Once rinsed and dried, it’s time for paint.

Propeller blades can generally be painted any color you wish and the shop has done some interesting and highly professional paint work for props used on airshow aerobatic airplanes, and also for owners who want to match the prop with the aircraft’s custom paint scheme. Black and grey are the most common, and black is almost always used on the face of the blade (or the area that faces the pilots) to eliminate sun glare. The tips are striped so they’re visible to ramp dwellers.
Sensenich uses Sherwin-Williams Polane T Polyurethane metal-finish enamel, a two-component low-gloss paint coating that has good durability. It’s available in a wide variety of colors and has good impact and abrasion resistance.
Composite blades are first coated with spray fill to fill in small voids, pinholes and any imperfections in the composite surface of the blade. Overhauls and repairs to composite propellers, which have gained popularity in recent years, involve an even more tedious and specialized process. We’ll look at composite prop care and feeding in a separate article.
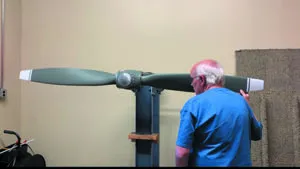
Once painted, it’s time for final assembly. The assembly station is where the blades and hubs come together. Blade angles are set, de-icing accessories are installed and the prop is made ready for static balancing. All the hardware is properly torqued and safety wired per manufacturer’s specs.
The final stage is balancing, where the prop is put on a balance fixture and is precisely balanced in both the horizontal and vertical positions. Weights, washers and screws are used to achieve the correct balance.
Back On The Airplane
“As an experienced propeller overhaul shop we strongly suggest having the propeller dynamically balanced on the airplane—essentially marrying the overhauled prop with the aircraft’s engine,” Landis told me. He makes a good point that balancing problems cause vibration and a chain reaction of issues—everything from cracked spinners and cowlings, to premature wear of instruments and also pilot fatigue. Shops we talked with spoke highly of the RPX DynaVibe balancing system, which uses a handheld analyzer and accelerometer sensors that are attached to the engine to measure vibrational movement of the prop and the engine. Most shops also use a tachometer to measure the engine RPM during testing.
Once the system calculates the vibration magnitude, it suggests a solution for countering the imbalance with weights on the propeller’s spinner or if it’s a Lycoming engine, on the flywheel—both of which are equipped for mounting the weights.
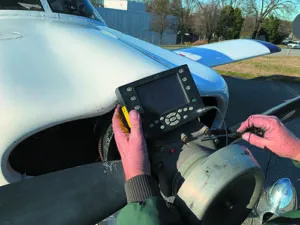
Some propellers require frequent inspection, as is the case with some Hartzell HC-2Y-series props installed on some Lycoming 360-series engines. It’s FAA AD 2006-18-15 that requires an electromagnetic Eddy current (ECT) inspection to check for internal failure of the hub, and the potential for the blade separating from the hub—which prompted the AD. I witnessed an Eddy current inspection performed on a Piper Arrow during my visit to the Sensenich shop. A single fine-winding ECT probe placed on the case of the hub creates a magnetic field within the metal and the instrument (via display) shows any discontinuities (a change in amplitude and phase) within the metal. There’s little disassembly required other than removing the propeller spinner, and the inspection generally costs around $200.
According to the AD, the inspection must be accomplished every 100 operating hours, or at every annual inspection, whichever comes first.
Repair Versus Overhaul
As prop work is concerned there’s either a full-up overhaul as we outlined in this article, or repair/reseal. During the reseal/repair of a constant-speed propeller it’s disassembled, the components are cleaned, the old grease is removed, the old seals are removed and the tech will conduct a visual inspection. He or she is looking for corrosion and any obvious damage to the components. If all is good, the tech will dress the blade’s leading edge while looking for nicks that can ultimately stress the blade. The blade may then be Alodined and painted. The propeller is then reassembled with new seals and balanced, and paperwork will be issued returning the prop to service.
To summarize an overhaul, the propeller is completely disassembled, parts are etched down to bare aluminum and an NDT inspection is performed. The steel parts are magnafluxed, dimensionally checked and any parts under limit will be red-tagged and replaced with a new or overhauled component.
Consider too that the manufacturer’s overhaul manual requires replacement of seals, O-rings, bearings, retainers and other hardware. (That’s generally not going to happen during the repair/reseal process.) The blades of course are reconditioned and repainted.
Cost And Downtime
Pricing for propeller overhauls can vary widely by model, but our research showed that an overhaul on a basic fixed-pitch propeller might run anywhere from $1000 to $1500, while constant-speed propeller overhauls range from $3000 to north of $4000. Full-feathering turboprop overhauls can easily top $7000. These general prices don’t include shipping, pickup and delivery, de-ice boots and other accessories. Re-pitching is generally an added expense. Depending on the workload of the shop and the complexity of the propeller, downtime could range from a couple of weeks to a month or more.
Worth mentioning is that propeller logbook entries are required to indicate the time since overhaul (or since new) and should be used as a general basis for subsequent overhauls, but periodic upkeep between the TBO period will likely be required. The engine to which the propeller is mated determines the pattern of vibration, stress and centrifugal force (10 to 25 tons) that props absorb and is related to the TBO. Calendar-time requirements are related to the life of seals and other components. Some props never reach the TBO because of corrosion, damage and because they’re subjected to harsh operations (water flying and unimproved surfaces come to mind).
Inevitably, flying hours or calendar time will send a propeller to the shop for overhaul. If you fly a lot, how you care for it along the way can make the difference between making it to TBO or not. I think the best thing an owner can do is inspect it before every flight, keep it clean, keep the paint touched up and follow the prop manufacturer’s maintenance schedule.
This article originally appeared in the March 2020 issue of Aviation Consumer magazine.
For more great content like this, subscribe to Aviation Consumer!

Good article.
I finally convinced the co-owners of our 1961 Cessna to overhaul our 61 year old prop that had never been off the engine in 4,000+ hours.
The OH shop found a crack in the center bore, which was not visible while on the engine.
The crack was inline with a prop bolt and could have cause the prop to fail.
So the prop was red tagged and we needed to find a replacement. The OH shop found a used prop, overhauled it and we’re flying again.
In 8 years we’ll be sending the prop for overhaul, even though it will probably only have 800 hours on it. The $1,200 is well worth the effort to know we have a reliable prop.
Some prop shops/manufacturers do not allow props to be polished bare metal, and consider those props as unairworthy. Be careful before you create an expensive problem! TC
From my comment above…we got our red tagged fixed pitch prop back, now as great wall art, with bare aluminum.
I was surprised that when you tap the blades the prop rings like a bell.!
I can imagine that the paint suppresses the ringing vibration which could cause a crack to develop in the blades.
Also, we put ‘prop guard’ tape on the leading edges of our new prop, and after a year, the prop still looks like new – no paint loss on the leading edges.
‘prop guard’ is an FAA-PMA part, abnd well worth the $100 it cost.
Re: TomC and polished props: Yes, this is an oft-repeated matter. In fact, a close friend received a “Condition Tag” on his airplane issued by an FAA Inspector who, upon inquiry, remarked that the polished condition of the prop was “not approved” because (the inspector explained) it did not meet the mfr’s anti-corrosion-treatment (paint) upon which the prop Type Certificate was based. My friend contacted an aviation attorney who in-turn contacted the inspector and asked how then did the FAA’s own DC-3s polished props were “approved”.
The condition tag was recalled and nothing further.
Good article, Larry. I had an opportunity a couple years ago to tour the Hartzell factory in Ohio. I was amazed at the complexity of shaping metal props and the amount of machining and processing involved. What was even more amazing was the exhibit they had comparing an aluminum blade with a composit blade for the same application. The difference in weight was dramatic, which explains one of the positive benefits of switching from aluminum to carbon fiber. If my McCauly metal prop ever needs replacing, I would switch to composit without hesitation.
Years ago my friend and his partner were ferrying out a sold vintage airplane to the new owners. Said aircraft had a wooden propeller. From Chicago to Pennsylvania. They were on short final to the destination airport when a chunk of the propeller detached. They put down in a field 3 miles short. Did some damage to the airplane, but nothing to themselves. Matter of fact, they walked to the airport and reported the incident. Propellers are not something to be ignored.